[ DVR ] [DVR-Installation] I connected the camera but the signal does not work.
First of all, when connecting the main equipment, confirm that the cable’s +,-cord is accurately
connected. Then go to Setting → Camera → PTZ and set the ID, protocol, and transmission
speed.
[ DVR ] [DVR-Login] Upon clicking on the menu icon button, the message
In order to execute a function you must log in. Use the keyboard on the screen to enter your password.
The initial password is set as "000000".
[ DVR ] [DVR-Login] Upon clicking on the set-up button, the message
Depending on the user, there are different user rights.
- ADMINISTRATOR : Able to carry out all the functions.
- POWER USER : Able to carry out all the functions excluding the configuration.
- NORMAL USER : Every function is restricted except: screen partition and real-time screen surveillance.
[ DVR ] [DVR-Login] Upon logging in, a portion of the channel screen does not appear and only the LG logo appears.
If the “covert” status is “ON” for a certain channel, “power users” or “normal users” cannot access the video.
Please change the “covert” status to “OFF” to see the videos for the channels you cannot see at the moment.
Administrator log-in → Settings → Camera → Covert → OFF.
[ DVR ] [DVR-Display] The screen suddenly displays only one screen.
Confirm that the Menu control stick → MAIN → Screen partition space is not set as one. You can also set to partition screen
simply by double-clicking your mouse.
[ DVR ] [DVR-Display] While using the VGA monitor, I switched to the TV monitor and the screen does not show anymore.
If you used the VGA monitor as the main monitor and then started using the MAIN OUT monitor as the main monitor,
press the SPOT button on the front of the equipment until a you hear a signal sound. The DVR will reboot and the TV(Composite)
will be set as the main monitor.
If you wish to execute the other way around and switch from the TV(Composite) to the VGA, press the MAIN button until
you hear a signal sound.
[ DVR ] [DVR-Record] How can I choose the appropriate resolution for each environment?
Please refer to the "Recording Time Table" located at the very last page of the manual for the DVR's recording time.
This table, assuming moderate activity in the image, offers recording time information based on different resolutions,
image qualities, and fps when the 250GB hard disk is in use. However, the information in the table can vary depending
on the activity level and complexity in the image.
Should there be a need to record for a long period of time, set the resolution, image quality, and fps as low. For sites where
activity is rare, it is efficient to set the DVR so that it records only when there is motion. That way, you can use the hard disk for
a longer period of time.
If image quality is more important than the recording time, you can set the resolution, image quality, and fps as high.
[ DVR ] [DVR-Record] I set the recording configuration as
Please check the following items.
1. HDD recognition : Check the HDD information on the information window.
2. Recording configuration : Double check the recording configuration for each channel and day.
3. Event partition : If the event partition is at 100%, there is no HDD space for continuous recording.
4. Overwriting : If the overwriting setting is off or it is set as an event partition, continuous recording will not work
after the event partition capacity is full.
[ DVR ] [DVR-Record] Motion recording does not work.
1. Recording schedule (setup → schedule)
2. Motion sensitivity: no motion event will be generated if set as "None".
3. Motion region : no motion event will be generated without a set motion region.
4. Event partition : if the value is "0%", no motion event will be generated.
5. Overwriting : if the event partition is full while the "overwriting" feature is set off, motion recording will not work.
[ DVR ] [DVR-Record] I set the DVR as motion recording, but the blue M icon does not appear; instead, a green icon appears.
Did you press the REC button on the remote control after adjusting the recordings settings? If you press the REC button
on the remote control, recording will be executed immediately and thus a continuous recording will take place.
In order to stop the immediate recording function, press the REC button one more time.
[ DVR ] [DVR-Play] I wish to watch the video recorded yesterday. How do I play it?
Go to Search(Magnifier icon) → Date search → Time search and press the OK button.
[ DVR ] [DVR-Play] When playing the video, is assigned playing possible?
When playing, use the rewind, fast-forward buttons on the bottom right to play and play backwards.
You can play backwards with a speed 2times, 4times, 8times, or 16times faster.
You can play normally with a speed 2times, 4times, 8times, 16times, and 32times faster.
[ DVR ] [DVR-Play] I am trying to watch the video recorded yesterday but the message
When you go to Search → Date/Time search → Update, a bar according to the recording settings will appear on the right table.
After selecting the channel(vertical 1~8/ 1~16) and the time (horizontal 02~22), press the play button on the bottom left.
[ DVR ] [DVR-Play] While watching the recorded video, the video keeps snapping and there are parts missing in the middle.
Are you using the motion recording method? Please check the recording schedule (setup → schedule).
When using the motion recording method, it will only record when there is motion; thus when there is no motion,
it will seem as if the video snaps and there are missing parts.
[ DVR ] [DVR-Backup] I got a backup but it won't play on the PC.
The DVR Set-up - System - Backup only plays on the DVR; when playing on the PC, you must receive the Export backup.
Menu Control Bar → Export → Equipment, channel, date/time → Copy. After backup, you can play by using the Export view
that forms with the recorded data.
[ DVR ] [DVR-Backup] I wish to
It could vary depending on the size of the recorded data within the HDD, but it is not possible to "Export" the data
recorded over a long time interval at once. It is secure to divide the entire time by 2 hours intervals before exporting the data.
[ DVR ] [DVR-Backup] When executing the backup, can I backup by using a program that can be played by AVI files or other general players?
When executing backup by using Export as a Client, it is possible to save using AVI files. However, if you save as AVI files,
you must install the Client program on the PC in order to install the codec needed to execute other players.
[ DVR ] [DVR-Backup] I am trying to backup on my USB memory stick, but the message
Please format using the Delete Media item on the backup screen settings. Before doing so, secure important data
in your USB somewhere else.
[ DVR ] [DVR-Network Set-up] I wish to gain access from remote areas through the internet. How do I set-up? (When using a fixed IP)
Connect the MODEM to the LAN port on the back side of the DVR.
You can access the web viewer on the internet by using the address at DVR menu control bar → INFO(System info).
Please enter http:// in the internet address space and enter the confirmed IP address as well. You can gain access
by logging in through the ID and PW used for the DVR.
- The standard ports for LE6016, LE3116, LE3108, LE2116, LE2108, LE2104 are TCP/IP 9001 and Web server 80.
- The standard ports for LE1004 are Web 80, Play 9091, and Live 9092
[ DVR ] [DVR-Network Set-up] I wish to gain access from remote areas through the internet. How do I set-up? (When using a fluid IP)
Set the IP assigned by the router as fixed on the DVR, then go to the router settings to port forward the TCP/IP port
and Web port according to the DVR IP.
Use the Network IP address shown on DVR menu control bar → INFO(System info) to port forward the standard ports
in the router settings - 9001 and 80.
* For the LE1004, use the network IP address to port forward the standard ports in the router settings - 80, 9091, 9092.
After port forwarding, use the Wan IP on the router to access the web viewer on the internet.
Please enter http:// on the internet address space and the confirmed IP address.
You can use it as the Fixed IP if you go to DVR Setup → Network → TCP/IP and enter the IP address,
subnet mask, and gateway then set the DHCP as OFF.
The standard value of the Web port used for the DVR is 80.
If an error occurs while using port 80, change to another number and port forward that new number.
[ DVR ] [DVR-Network Set-up] I am using a fluid IP and router. I wish to access the DVR as a Client by connecting to the network.
When using a router, you must first set the assigned IP as fixed on the DVR.
Then you should go to the router settings and port forward the TCP/IP port and Web port for the DVR IP.
[DVR1]
▶ Setup - Network - TCP/IP
▶ DHCP : OFF
▶ IP address, subnet mask, gateway : manual
(Example) 192.168.1.12, 255.255.255.0, 192.168.1.1(Standard router's interior IP)
▶TCP/IP port : manual, (ex)9002
** When connecting more than two DVRs to one router, you must use different IP addresses and TCP/IP ports.
[Router]
▶Port forwarding
Set up the router so that the IP for each DVR can use the assigned port, refer to the router manual.
[ DVR ] [DVR-Network Set-up] The IP is set as 192.168.0.16 but the web doesn't connect from the interior.
192.168.0.16 is a IP that is set even if the network isn't connected.
If there are no problems with the router or the connection cable, set Setup → Network → TCP/IP → DHCP : ON,
and reboot the DVR and the router equipment.
If the same phenomenon occurs even after the reboot, set Setup → System → Setup → Setup Initialization.
However, the standard setup value becomes initialized upon initialization.
[ DVR ] [DVR-DDNS] I wish to use the DDNS.
In order to use the DDNS, you must first set the network.
Set the network appropriate to the fixed IP, fluid IP, or router environment.
When the network setup is completed, go to Setup → Network → DDNS menu and set the DDNS service item as ON,
then enter any name for the host name. Click the update button and the hostname for the DDNS server will be entered.
A 'success' message will appear.
In case of failure, follow the instructions on the message.
After the hostname is entered, you can enter the hostname on the internet browser address space in place of the IP address.
[ DVR ] [DVR-DDNS] The update does not work.
Is the DDNS service set as OFF?
1. Set the DDNS service as ON, then enter the hostname.
2. Press the update button.
3. If the update is successfully applied to the DDNS server, the address ******.lgddns.com will be formed in the host space.
4. If the update is not successfully applied to the DDNS server, the message "DDNS server not found.
Please check the network setup" will appear.
In this case, if the modem and router has no defect, double check the network connection cord. If the router port has
a defect or the product experienced a temporary defect, reconnect the LAN cable and reboot.
[ DVR ] [DVR-Web Viewer] I cannot connect to the web using the DDNS host or IP address.
Please check the following items. 1. Network connection
1) Cable connection status:
Check that the green LED is ON and the yellow LED is blinking on the LAN port.
2) IP, Subnet mask, Gateway status
- Use Fixed IP: check if the value is accurate
- Fluid IP: Check the IP assignment in the Info screen
3) Go to Setup - System - NTP menu and set NTP as ON.
Carry on TEST and confirm Network's connection.
4) If using router, check that the port forwarding for the web port is complete.
2. DDNS Setup
1) Confirm that the DDNS usage is ON
2) Update DDNS and renew to current status
3. Confirm address on the web browser
1) Did you enter http:// before the address?
2) Did the port change?
If the Web Port did change, place (:)+alteration port at the end of the address.
If the TCP/IP port changed, you must enter the changed port in the log-in page port LAN.
http://hostname.lgddns.com:webportnumber
[ DVR ] [DVR-Web Viewer] How do I play?
The play function is not supported on the web viewer. If you wish to use the play function, install the Client program
and enter as Client. Web viewer only supports live functions.
[ DVR ] [DVR-Web Viewer] I logged in successfully but I cannot watch the video.
Did you log in using an ID other than the administrators?
Is the Covert Function set as ON in the DVR settings?
Channels set as Covert is only available to administrators, and thus is not available for power users and normal users.
Alter the Covert setting to OFF. Administrator Log in → Setting → Camera → Covert → OFF
[ DVR ] [DVR-Web Viewer] I am trying to watch the video by accessing the DVR through the Client program or Internet Explorer, but a black or blue screen is all that appears.
In order to see the DVR video through the client program or internet explorer, the following must be satisfied.
Referring to LG security micro-site of Recommended PC Specifications.
Depending on the Graphic card, the video may not appear even though the above specifications are satisfied. In this case,
select Windows Start → Execute, enter “dxdiag.exe” in the 'open' window, and execute the DirectX diagnosis tool.
Select the display tab and set the middle DirectDraw acceleration as Don't Use, and close by clicking on the End button.
[ DVR ] [DVR-Web Viewer] I wish to see the DVR screen through the Internet.
1. Execute the web browser.
Enter "HTTP://" in the address space, then enter the DVR product's IP address or the hostname formed by the DVR Settings Menu → DDNS section.
2. If the web viewer screen does not appear, check the setup of the DVR's TCP/IP.
During the initial execution of the web viewer, a warning message will pop up. You must press the install
button to install the web viewer related programs. If you do not install these programs when the
warning message pops up, you will not be able to use the web viewer program.
The Web port's standard value used by the DVR is 80. If an error occurs with port 80, change the Web port to another number
then post forward the new number.
[ DVR ] [DVR-Client] I installed the Client program but cannot log in.
After installing the program, you must enter the access information.
Tools → Access Inventory → Add → Site name, IP address, Port Enter → OK.
When the site's name entered on the left is produced, right click and log in as a user.
If the live video does not appear immediately after logging in, double click the site name and drag the Cameras item to
the channel screen.
[ DVR ] [DVR-Client] Access does not work all of a sudden.
1.Check Network Connection Status - Cable connection status : The green LED is ON, and the yellow LED is blinking on the LAN port.
- IP, Subnet mask, Gateway setup status
- When using a Fixed IP: Check if the accurate value is entered.
- When using a Fluid IP: Check the assigned IP on the Info window.
- Go to Setup - System - NTP Menu, set NTP as ON, execute TEST, and confirm Network connection.
- In case of using a router, confirm that post forwarding is complete for the port.
2.DDNS Setup
- Check that DDNS usage is set as ON
- Update DDNS to renew to current status
[ DVR ] [DVR-Client] When there is no problem with the network itself, the execution time is slow when using the web or client to watch the video.
The usage of the Client or Web viewer has a great impact on the network environment.
It is affected by the DVR and Client's network speed, Bandwidth, traffic amount, and so forth, and thus results
in snapping videos, postponement of transmission, and end of access. Every DVR has a bit of difference,
but any DVR gets affected by the network condition.
[ DVR ] [DVR-Client] During access, the message
Are you already logged in through the same ID?
While accessing the DVR from far away, overlapping IDs are not supported.
Produce another ID other than the administrator's.
Setting → System → User
[ DVR ] [DVR-Client] During access, the message
When accessing simultaneously, up to 5 people are allowed to access the DVR. After two or more power users log in,
log in must be executed by through the normal user.
If there is no user at the moment but the message keeps appearing, reboot the DVR. The DVR may have received
the logout message late. When logging out, you must right click the site's name and select User Logout.
[ DVR ] [DVR-HDD] The recommended hard drive is set as SEGATE; are HDDs from other companies not compatible?
The recommended HDD is a Security exclusive HDD, and thus guarantees better trust than the general PC HDD.
Further, the recommended HDD has been proven of its safety and compatibility through tests.
Other HDDs may be installed, but no service will be supported if a defect occurs.
Further, those HDD installed through factory shipment are the only ones available for A/S.
If another company installed the HDD, you must receive A/S from that specific company.
[ DVR ] [DVR-HDD] Suddenly during usage, recording stops working. There seems to be no problem with the setup but the hard drive cannot be read.
Did you install the 1TB HDD?
The 1TB HDD did not go through the compatibility test, and thus a defect may form later on. In this case,
you may be able to reuse through HDD formatting, but more defects may occur in the long run.
[ IP Camera ] Is IP Software available in multi-language?
- Smart Station and Web Interface currently supports English. Other languages will be available in the near future,
and they will be supported according to priority of requests.
[ IP Camera ] Does LSS(Smart Station) support Motion detection?
- Motion detection is supported.
[ IP Camera ] Is Remote Interface supported in LSS(Smart Station)
- Currently Smart Station does not support Remote Interface. It will be supported in the next version.
[ IP Camera ] Is Password auto-save possible?
- Password auto-save function is supported, so user can store the password when logging in
[ IP Camera ] Is View stored if the PC with Smart Station shuts down and reboots?
- Handling of Recoding function takes place, but recording does not occur when PC shuts down
[ IP Camera ] Is Image Editing possible using EMAP in LSS(Smart Station)?
- Image Editing is currently not supported
Image Uploading/Replacing is possible
[ IP Camera ] What is the IP Camera Channel number in which NAS can be used reliably?
- Max. 16CH recommended considering Reliability and Performance
* Currently Sony, Panasonic works at 32CH
[ IP Camera ] Is LG IP Camera SDK(API) provided?
- Currently2 types ofSDK(API)are supported
- DLL(DynamicLink Library) Version
- Doesnot include Renderer, so Renderer must be made from an Integration firm
- Flexibleversion
- ActiveXControl Version
- Rendereris included, so there is no need to create new Renderer
- User-friendlyversion
- PTZControl is included
- IPCamera’s Setting, WSDL document for PTZ Control provided
[ IP Camera ] Does Smart Player support File Export function?
- Currentlythis function is not supported. Files must be added to Smart Player
[ IP Camera ] Is it possible to view recorded video using remote NAS by loading it onto Smart Station? Is File Export (AVI) possible?
- Only the recorded videos of IP cameras, that are registered with Smart Station, can be loaded and viewed.
Loading a remote video and monitoring it on Smart Players is possible if user installs NAS and connects it using network drive
- To watch the "NAS-stored" recorded video of IP Camera (registered with Smart Station) using another Smart Station,
user must register the IP Camera onto the new Smart Station and export file as AVI
Note) If Smart Station is installed in two places (#1: Local N/W within IP router, #2 N/W outside of IP router),
video can be recorded using NAS in one place, and Smart Station in another place.
However, 1 IP Camera cannot be recorded to both NAS and Local HDD of Smart Station using only 1 Smart Station.
(Will be recognized as a single Local HDD in NAS, Local HDD, and Smart Station)
[ IP Camera ] Is simultaneous recording possible between NAS that is installed with IP camera (same subnet) and Smart Station?
Yes, simultaneous recording is possible if you install Smart Station within the local n/w of IP router and configure
it so that it can record to NAS and install Smart Station outside of the router, so that it can record separately (local HDD)
For storage:�
Within router: NAS�
Outside of router: Local HDD
[ IP Camera ] Recording does not work
1. Check Video Stream was assigned after setting up Recording Schedule
If Video Stream Video Stream is not assigned, Recording does not start. Therefore, after registering schedule,
your must assign schedule to a preferred video stream.
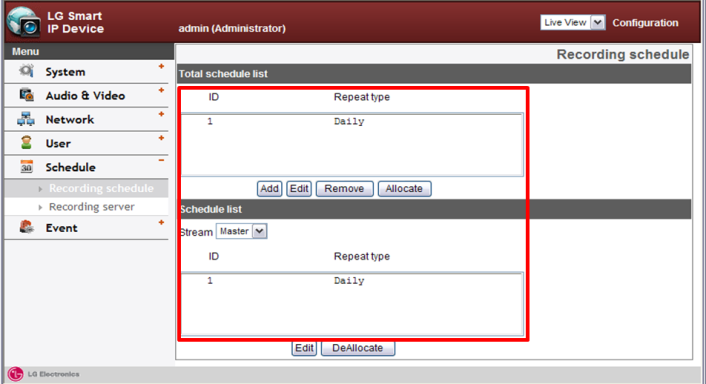
2. Check Recording Server Informatio
Check Enable status, IP Address of NAS, UserID/Password, shared folder channel
Recording Server Setting cannot be controlled on the web, Smart Station must be used.
(Refer to Smart Station Manual)
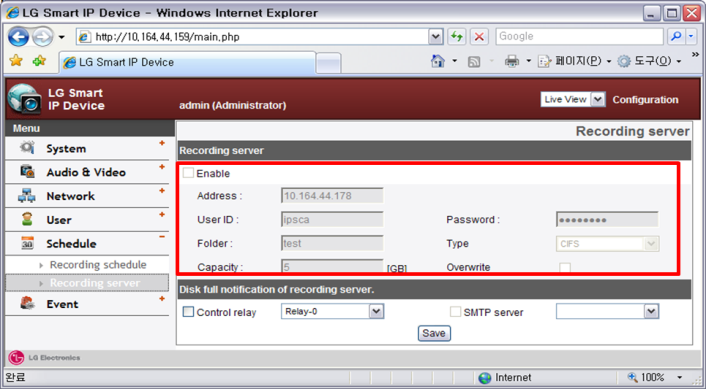
3. Check the status of Recording Server
Windows Control Panel → Map Network Drive → Connect NAS and check if it works
If network drive is connected, but file copy or directory creation does not work: User does not have
proper “write” authority, therefore recording may not work
→ Check User authority of NAS (Refer to NAS equipment manual)
[ IP Camera ] What is the general Bandwidth of an IP Video System?
- BandwidthBudget Available
- Betweenbuildings: .5Mb/s ~ 5Mb/s
- Withinbuilding: 70Mb/s ~ 700Mb/s
- BandwidthCost
- IPcamera:1Mb/s
- Megapixelcamera:5Mb/s~ 10Mb/s
- IPmegapixel camera
- 1fpsstandard1.3megapixel camera’sbandwidth:below0.8Mb/s(800Mb/s)
- 1fpsstandard5megapixel camera’sbandwidth:45Mb/s
Fromipvideomarket.com
[ IP Camera ] How to set up IP Camera's DDNS within IP router & IP Camera's DDNS within Smart Station; How to use Port Forwarding
- CurrentlyPortForwarding is only possible with Megaproducts
- Portlist that must use Port forwarding in Mega
- RTPover TCP
- 80:HTTP, 554: RTSP
- RTPover UDP
- 80:HTTP, 554: RTSP
- 6970~6981:RTP & RTCP ports for Master & Slave streams
- ForIP router: RTP over TCP recommended
- Dueto few numbers of Port, and the long hopping length for data that istransmitted outside of IP router
- ConfiguringIP Camera’sPortForwarding
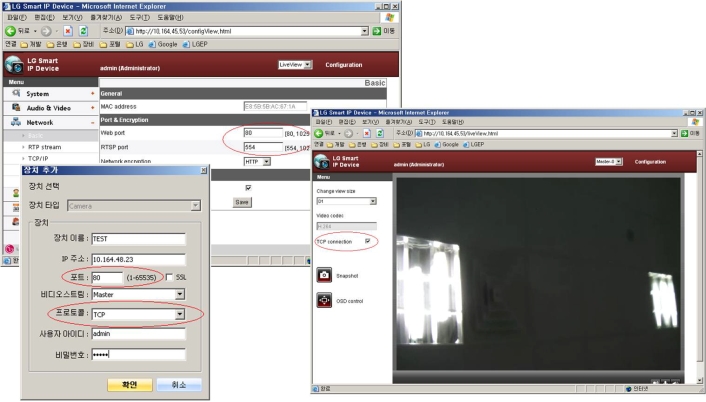
- WebClient Configuration >> Network >> Basic >>Check current Port
- InWeb PortandRTSPPort, increase Port+1000 for each camera
- Ex)#1Camera→ 1080,1554; #2 Camera→2080,2554
- Configurationmethod for IP CameraRTPover TCP
- Ifrequest is sent using TCP on Web Client or LSS464,it delivers RTP over TCP so extra configuration is unnecessary
- Whenregistering IP Camera on LSS 464, configure to TCP. Enter Web Port at thistime.
- IPaddress: Enter Public IP address of IP router
[ IP Camera ] When IP appears as 169.254.x.x
1. When set to DHCP, and connected to a network without a DHCP server
Fix the IP using a router or connecting directly to a PC
2. If search was done before IP was assigned by DHCP server
Try searching again after waiting for a moment, and check if a viable IP was assigned
If a viable IP was not received, turn off power, restart device, and check again
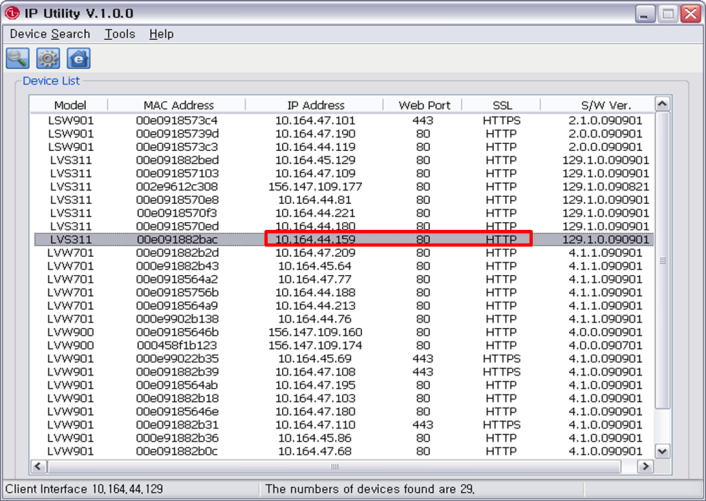
[ IP Camera ] Problem connecting to Web Viewer
1. Search device using IP Utility, Check IP/Port etc, Re-connect
[ IP Camera ] Audio does not work
1. Check Audio related Configuration
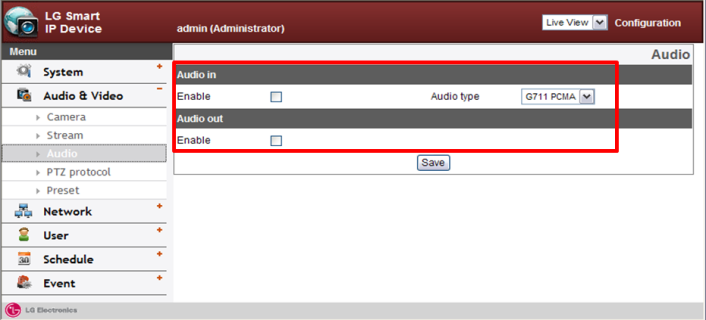
2. Check PC’s Volume Setting
3. Check the physical/connection condition of Mic/Speaker
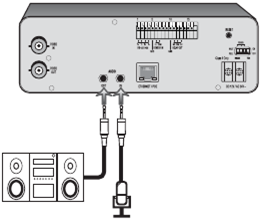
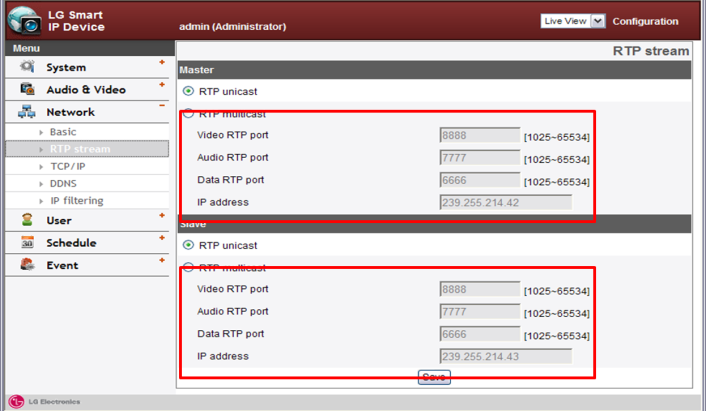
[ IP Camera ] Image is overlapped with image from a different device
1. In Configuration, check if RTP Multicast IP or Port is set identically with another device
When using Multicast: If Multicast IP or Port is set identically with another device, data ends up being delivered using
the same channel, so an overlapping image can result
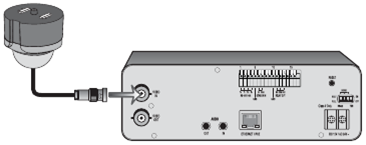
[ IP Camera ] Image is too dark, too bright, or blurry
1. Check the condition of camera connected to LVS301
Directly check image by connecting camera to monitor
2. Check the connection condition between LVS301 and camera
3. Check camera related setting in Configuration
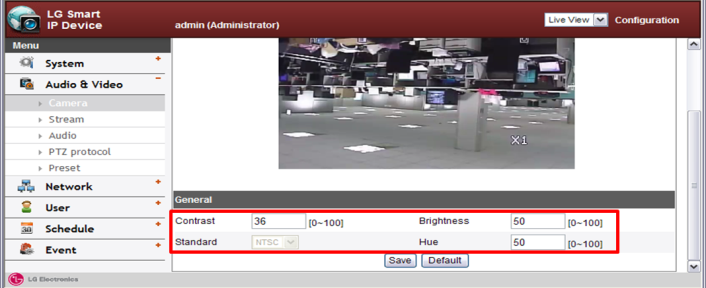
4. Check Video Stream related setting in Configuration
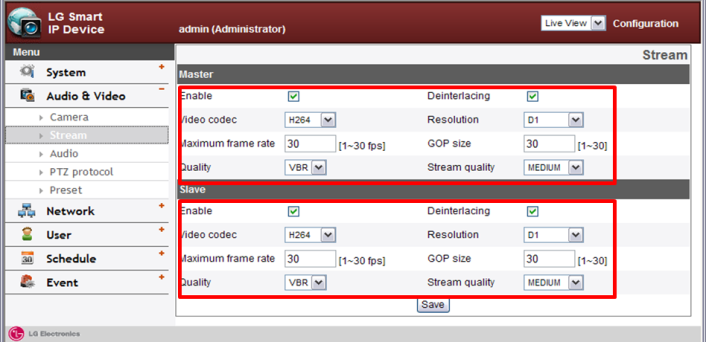
5. Check camera direction
Check if it is pointing at a source of light, or an area where light cannot enter
[ IP Camera ] Question – Image is frozen
1. Web page refresh
Refresh the Live View page by clicking the page refresh button on Web Browser
2. Re-check the IP address if configured to DHCP
Search Device using IP Utility, and check IP Address by finding the MAC address of device
If IP address has been changed, re-connect using new IP
3. Check Power and Network connection
[ IP Camera ] Image does not appear: 1st Generation (LSW900, LVW700, LVW900)
1. CheckJava Runtime Environment installation(Requires JRE 1.6.0.11 or above)
PC: Start menu→ Control Panel → Add/Remove Programs
Check if Java is installed. If not, download the newest JRE from http://java.sun.com and install
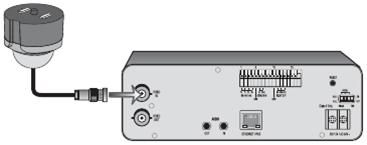
2. Checkcable connection for image signal transmission
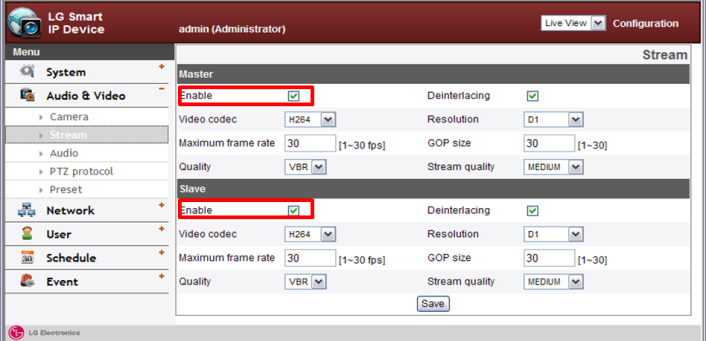
3. CheckVideo Stream setting in Configuration
4. CheckTTL value when configured to Multicast
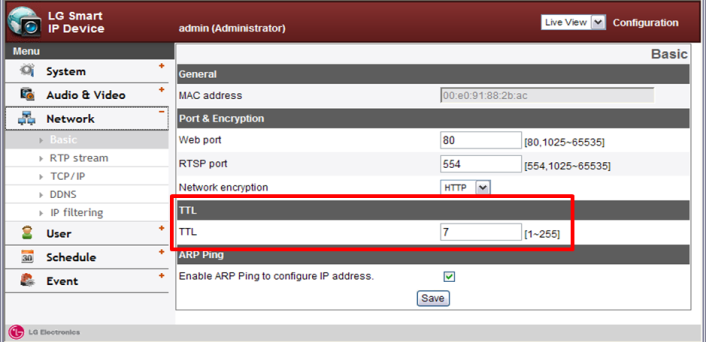
5. Check Firewall setting
If LVS301 is set up within a Network with firewall, and you wish to connect from outside network connection permission is required from firewall (set up through Network administrator)
6. Check Power and Network connection
[ IP Camera ] PTZ movement does not work (LVS301)
1. CheckUser authority

Only Administrator or Power User can control PTZ Control
2. CheckPTZ related setting (Must be identical to connected camera’s setting)

a. CheckPTZ Protocol setting
b. CheckCamera ID
c. CheckSerial port Baud Rate
3. Checkcamera connection
[ IP Camera ] [DVR-HDD] The recommended hard drive is set as SEGATE; are HDDs from other companies not compatible?
The recommended HDD is a Security exclusive HDD, and thusguarantees better trust than the general PC HDD.
Further, the recommended HDDhas been proven of its safety and compatibility through tests. Other HDDs maybe installed,
but no service will be supported if a defect occurs.
Further, those HDD installed through factory shipment are the only onesavailable for A/S. If another company installed the HDD,
you must receive A/Sfrom that specific company.
[ Analog Camera ] [Box Camera] I am installing for the first time but the image is not generated.
By using thelens adjustment switch on the exterior of the camera case, set up to the DC,ELC, or Video position according
to the lens type installed.
[ Analog Camera ] [Box Camera] When generating the image, the short-distance images are clear but the long-distance images appear cloudy.
Remove theC-mount adaptor between the camera and the lens.
[ Analog Camera ] [Box Camera] The image of the person standing at the window appear dark.
Set the ExposureMode-Wide Dynamic Range function as "ON".
[ Analog Camera ] [Box Camera] The IRIS appears too bright and a rash phenomenon occurs.
1. Confirmationof the exposure mode setting is needed.
- When using the DC Lens : Aperture priority mode
- When using the ELC Lens : Shutter priority mode
2. Confirm power supply
[ Analog Camera ] [Zoom Camera] Upon detection of motion, the camera does not function after zooming in.
When operatingthe camera while detecting motion, the function gets removed. In order tore-operate the function, zoom out
as was before.
[ Analog Camera ] [Zoom Camera] I set the protocol to Pelco D, but the signal is not controlled.
In theInitialization - Protocol setting, select PELCO D and press the "M"button. The camera will reboot and the setting
will be applied.
[ Analog Camera ] [Zoom Camera] While surveillance indoors and the shooting target is dark, the entire image appears dark.
1. Set-up withinExposure Mode
- Sensitivity Control : Intermediate
- Shutter speed : Auto
- Image accumulation : On
2. Set noise removal as intermediate
If you higher the sensitivity control and lower the noise removal, you will geta more natural screen despite the noise;
if you lower the sensitivity controland higher the noise removal, you will get a clearer screen.
[ Analog Camera ] [Zoom Camera] Can I set the camera so that I can hide the words on the screen?
In the specialmode - OSD setting, you can set the user phrase, zoom magnification indicator,function indicator,
and camera number as ON/OFF.
[ Analog Camera ] [Zoom Camera] The image appears white.
Pleaseinitialize - factory initialize.
(Within theset-up specification, initialization refers to the set-up specification foreach relevant function.)
[ DVR ] [DVR-HDD] Suddenly during usage, recording stops working. There seems to be no problem with the setup but the hard drive cannot be read.
Did you installthe 1TB HDD?
The 1TB HDD did not go through the compatibility test, and thus a defect mayform later on. In this case,
you may be able to reuse through HDD formatting,but more defects may occur in the long run.